

Oh, there’s just something magical about making a classic apple pie in October! The leaves are changing, the air is crisp, and the smell of cinnamon and baked apples fills the kitchen, wrapping you in a warm hug. This isn’t just any apple pie; it’s a cherished recipe that brings back memories of my grandmother bustling around the kitchen, her laughter mixing with the sound of the pie crust being rolled out. It’s the kind of dessert that warms hearts and homes, perfect for family gatherings or cozy autumn evenings.
What I adore about this recipe is how simple it is while still delivering that homemade goodness. You’re not just throwing together ingredients; you’re creating an experience, a moment of joy that everyone can share. Each slice reveals tender apples that are sweet and tart, nestled in a flaky crust that’s just begging for a scoop of vanilla ice cream on top. Trust me, once you take that first bite, you’ll understand why this classic apple pie October main is a must-have in your fall repertoire. Let’s dive into the details, and I’ll show you how to make this delightful treat!
Ingredients List
Gathering the right ingredients is key to crafting the perfect apple pie! Here’s what you’ll need to get started:
- 6 cups sliced apples: I love using a mix of tart Granny Smith and sweet Honeycrisp apples for that perfect balance of flavor.
- 3/4 cup sugar: This will sweeten the apples and create that delicious syrupy goodness.
- 2 tablespoons all-purpose flour: This helps thicken the juices from the apples as they bake, giving you that perfect pie filling.
- 1 teaspoon cinnamon: You can’t have apple pie without cinnamon! It adds that warm, cozy flavor that screams fall.
- 1/4 teaspoon nutmeg: A little goes a long way. It adds depth to the spice profile.
- 1 tablespoon lemon juice: This brightens the flavors and helps keep the apples from browning too quickly.
- 2 tablespoons butter: Dotting the filling with butter gives it that rich taste and helps with moisture.
- 1 package pie crusts (2 crusts): You can use store-bought for convenience or make your own if you’re feeling adventurous!
With these ingredients at hand, you’re all set to whip up a pie that will make your home smell heavenly! Don’t forget to have your favorite mixing bowl and a good pie pan ready to go. Happy baking!
How to Prepare Apple Pie October Main
Now that you’ve gathered all your ingredients, it’s time to bring this classic apple pie to life! Follow these simple steps, and you’ll have a beautiful pie ready to impress everyone:
- Preheat your oven: Start by preheating your oven to 425°F (220°C). This step is essential for getting that crust nice and golden!
- Mix the apple filling: In a large mixing bowl, combine the sliced apples, sugar, flour, cinnamon, nutmeg, and lemon juice. Gently toss everything together until the apples are well coated. You’ll want to let this mixture sit for about 10 minutes. This allows the apples to release some juices, and trust me, you’ll want that delicious syrup in your pie!
- Prepare the pie crust: Take one of your pie crusts and carefully place it into a pie pan. Make sure to press it gently into the edges and corners. Don’t worry about it looking perfect; a little rustic charm adds character!
- Fill with apples: Pour the apple mixture into the prepared crust, spreading it out evenly. Now, here’s my favorite part: dot the top of the apples with small pieces of butter. This little touch adds richness and ensures your filling stays moist.
- Top it off: Place the second pie crust over the filling. Crimp the edges together to seal the pie. I like to use my fingers to create a nice decorative edge, but you can also use a fork if you prefer. Don’t forget to cut several slits in the top crust; this allows steam to escape and prevents a soggy bottom.
- Bake the pie: Pop your pie into the preheated oven for 15 minutes. This initial high temperature will help set the crust. After that, reduce the oven temperature to 350°F (175°C) and continue baking for another 30-35 minutes. You’ll know it’s ready when the apples are tender, and the crust is beautifully golden brown. Keep an eye on it to avoid over-browning; if the edges start to darken too quickly, cover them with foil.
- Let it cool: Once your pie is out of the oven, resist the urge to dive in right away! Let it cool on a wire rack for at least 2 hours. This cooling time allows the filling to set up properly, making it easier to slice.
And there you have it! You’ve created a stunning apple pie that’s not just a feast for the eyes but also a delight for the taste buds. Serve it warm, and don’t forget a scoop of ice cream on the side for that ultimate fall treat!
Why You’ll Love This Recipe
- Quick and Easy: This apple pie comes together in no time! With simple steps and minimal prep, you’ll have it ready for the oven in just 30 minutes.
- Perfect for Fall: The cozy flavors of cinnamon, nutmeg, and sweet apples make this pie a quintessential fall dessert that everyone will adore.
- Family Favorite: It’s a crowd-pleaser at gatherings! Everyone loves a slice of warm apple pie, especially when served with a scoop of vanilla ice cream.
- Versatile: You can easily adjust it to your taste by using different apple varieties or adding in your favorite spices, making it truly your own!
- Memorable Moments: Baking this pie creates delightful memories in the kitchen, bringing friends and family together to enjoy the fruits of your labor.
Tips for Success
To ensure your apple pie turns out perfectly every time, here are some tried-and-true tips that I swear by!
- Choose the right apples: A mix of tart and sweet apples is key! I love using Granny Smith for their tartness paired with the sweetness of Honeycrisp or Fuji. This balance creates a wonderful depth of flavor in every bite.
- Don’t skip the lemon juice: Adding that tablespoon of lemon juice is a game changer. It brightens the flavors and helps keep the apples from browning, plus it adds a nice zing!
- Let the filling rest: Allowing the apple mixture to sit for about 10 minutes before filling the pie crust helps to draw out the juices, resulting in a deliciously syrupy filling that won’t run all over the plate.
- Cover the edges: If the pie edges are browning too quickly, cover them with strips of aluminum foil midway through baking. This way, you’ll keep the crust beautifully golden without burning it!
- Let it cool: I know it’s tempting to slice right away, but letting the pie cool for at least 2 hours is crucial. This helps the filling set up nicely, making for cleaner slices!
With these tips in your back pocket, you’re well on your way to apple pie perfection this fall!
Variations
While the classic apple pie recipe is simply divine, there are so many fun ways to switch things up and make it your own! Here are some delightful variations to consider:
- Spice it up: If you’re feeling adventurous, try adding a pinch of cardamom or allspice along with the cinnamon and nutmeg. These spices can add a warm, aromatic twist that enhances the apple flavor beautifully.
- Nutty crunch: Toss in some chopped walnuts or pecans for a delightful crunch. Just mix them in with the apple filling, and you’ll love the added texture and richness they bring!
- Caramel swirl: Drizzle some caramel sauce over the apple mixture before covering it with the second crust. This adds a luscious sweetness that pairs perfectly with the tart apples.
- Fruit medley: Consider mixing in other fruits like pears or cranberries. They can add different flavors and a pop of color, making your pie even more visually appealing.
- Cheese lovers: For a unique twist, sprinkle some crumbled sharp cheddar cheese on top of the apple filling before sealing the pie. The savory-sweet combination is surprisingly delicious!
These variations not only keep things exciting but also make every apple pie a new adventure! Get creative and enjoy experimenting with flavors that speak to you this fall.
Nutritional Information
Now, let’s talk about the nutritional side of this delicious apple pie! Keep in mind that these values are estimates based on typical ingredients, so they might vary a bit depending on what you use. Here’s a general breakdown for one slice of pie:
- Calories: 250
- Fat: 10g
- Saturated Fat: 3g
- Unsaturated Fat: 6g
- Trans Fat: 0g
- Cholesterol: 10mg
- Sodium: 150mg
- Carbohydrates: 38g
- Fiber: 3g
- Sugar: 20g
- Protein: 2g
This classic apple pie is a delightful treat, and enjoying it in moderation can be part of a balanced diet. So go ahead, indulge a little, and savor every bite of your homemade creation!
Storage & Reheating Instructions
Once you’ve baked your delicious apple pie and (let’s be honest) devoured a couple of slices, you might be wondering how to store the leftovers. The good news is that apple pie keeps surprisingly well! To store your pie, let it cool completely at room temperature. This step is crucial because it prevents condensation from forming inside the pie, which could make the crust soggy.
Once cooled, cover the pie loosely with plastic wrap or aluminum foil. If you have a pie box, that works great too! Store it in the refrigerator, where it can last for up to 3-4 days. If you want to keep it longer, you can freeze it. Just make sure to wrap it tightly in plastic wrap and then in aluminum foil, or use a freezer-safe container. It can be stored in the freezer for up to 2-3 months.
When you’re ready to enjoy those leftovers, reheating is a breeze! Preheat your oven to 350°F (175°C). Place the pie on a baking sheet to catch any drips and warm it in the oven for about 15-20 minutes. This will help revive that lovely flaky crust and warm the filling perfectly. If you’re in a hurry, you can microwave a slice for about 30 seconds, but know that the crust won’t be as crispy. Trust me, the oven method is worth the wait for that delightful homemade taste!
FAQ Section
Got questions about making this classic apple pie? No worries, I’ve got you covered! Here are some common queries I often hear, along with my tried-and-true answers.
- Can I use frozen apples for this recipe? Absolutely! If you have frozen apples on hand, they can work just fine. Just make sure to thaw and drain them well before mixing them with the other ingredients. This prevents excess moisture in your filling.
- What’s the best way to prevent a soggy bottom crust? A soggy bottom can be a deal-breaker! To combat this, make sure to pre-bake your crust for about 10 minutes before adding the filling. You can also sprinkle a thin layer of flour or cornstarch on the bottom crust before filling it with apples. This helps absorb any extra juices as they bake.
- How can I tell when the pie is done baking? The best way to check for doneness is to look for a golden brown crust and bubbling juices around the edges. You can also insert a knife into the filling; it should glide through the apples easily without resistance.
- Can I make the pie ahead of time? Yes, you can prepare the pie a day in advance and refrigerate it before baking. Just cover it with plastic wrap to keep it fresh. When you’re ready to bake, let it sit at room temperature for about 20 minutes before popping it in the oven.
- What’s the secret to a flaky pie crust? The key to a flaky crust is to keep your ingredients cold! Use cold butter and ice water, and handle the dough as little as possible. This helps create those lovely layers that make each bite melt in your mouth.
With these tips and answers, you’re well on your way to becoming an apple pie pro this October! Happy baking!
Print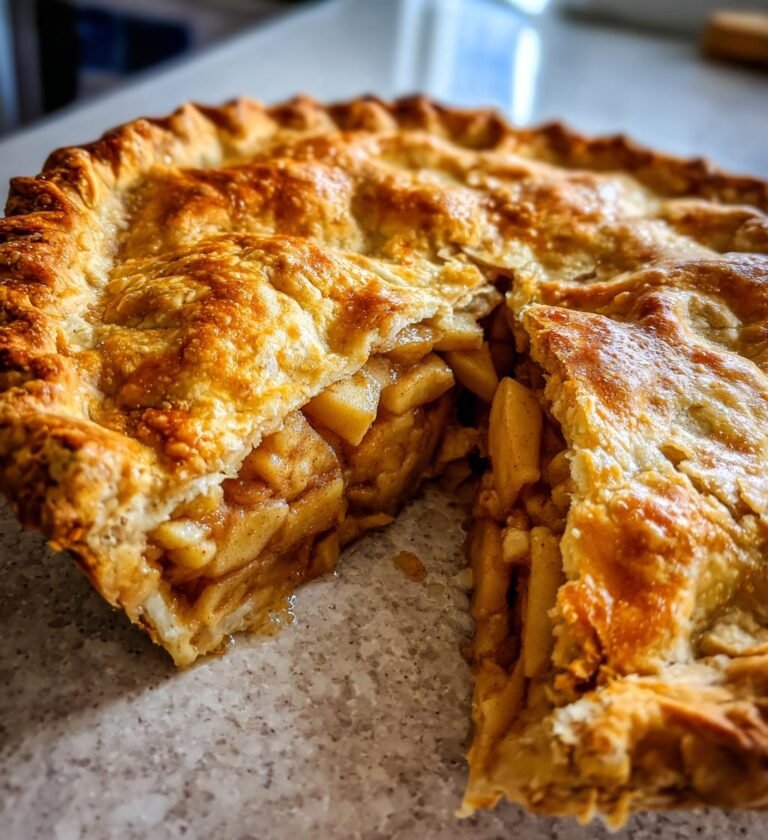
Apple Pie October Main: 7 Secrets to Irresistible Flavor
Classic apple pie recipe perfect for fall.
- Total Time: 1 hour 20 minutes
- Yield: 8 servings 1x
Ingredients
- 6 cups sliced apples
- 3/4 cup sugar
- 2 tablespoons all-purpose flour
- 1 teaspoon cinnamon
- 1/4 teaspoon nutmeg
- 1 tablespoon lemon juice
- 2 tablespoons butter
- 1 package pie crusts (2 crusts)
Instructions
- Preheat oven to 425°F (220°C).
- In a large bowl, mix sliced apples, sugar, flour, cinnamon, nutmeg, and lemon juice.
- Place one pie crust in a pie pan.
- Fill with apple mixture and dot with butter.
- Cover with the second pie crust. Seal edges and cut slits for steam.
- Bake for 15 minutes, then reduce temperature to 350°F (175°C) and bake for 30-35 minutes until apples are tender.
Notes
- Use a mix of tart and sweet apples for best flavor.
- Let pie cool before serving.
- Serve with ice cream for a treat.
- Prep Time: 30 minutes
- Cook Time: 50 minutes
- Category: Dessert
- Method: Baking
- Cuisine: American
- Diet: Vegetarian
Nutrition
- Serving Size: 1 slice
- Calories: 250
- Sugar: 20g
- Sodium: 150mg
- Fat: 10g
- Saturated Fat: 3g
- Unsaturated Fat: 6g
- Trans Fat: 0g
- Carbohydrates: 38g
- Fiber: 3g
- Protein: 2g
- Cholesterol: 10mg
Keywords: Apple Pie, Fall Dessert, October Recipe