

Ah, fall! The air turns crisp, leaves paint the world in vibrant hues, and the scent of fresh apples fills the kitchen. There’s something magical about this time of year, isn’t there? It reminds me of cozy afternoons spent with my family, picking apples at the orchard and dreaming up delicious desserts to make as soon as we got home. That’s when I first stumbled upon my love for apple bars. They’re not just a dessert; they’re a warm, sweet hug after a chilly day, bringing everyone together around the kitchen table.
With every bite of these *Apple Bars October Classic*, you get that perfect blend of tender apples, a hint of cinnamon, and a buttery, crumbly base. Trust me, they’re the ultimate comfort food for those fall gatherings! I can still hear my kids giggling as they help peel the apples, and the way their faces light up when they take their first bite of the warm bars, topped with a scoop of vanilla ice cream. It’s these little moments that make the hustle of the season worth it, and I can’t wait for you to share in that joy too!
Ingredients List
To whip up these delightful *Apple Bars October Classic*, you’ll need a handful of simple yet essential ingredients. Here’s what you’ll gather:
- 2 cups all-purpose flour: This is the backbone of your bars, giving them that lovely structure. Make sure to spoon the flour into your measuring cup and level it off for accuracy!
- 1 cup sugar: Granulated sugar adds just the right amount of sweetness to balance the tartness of the apples. You can even experiment with brown sugar for a deeper flavor, but I always stick to white for this recipe.
- 1 cup butter, softened: Use real butter here for the best taste and texture. Make sure it’s softened to room temperature so it creams nicely with the sugar.
- 1 teaspoon vanilla extract: A little splash of vanilla elevates the flavors, making the bars taste even more delightful.
- 1 teaspoon baking powder: This is your leavening agent, helping the bars rise and become fluffy. Don’t forget to check the expiration date!
- 1/2 teaspoon salt: Just a pinch of salt enhances the sweetness and balances the flavors beautifully.
- 3 cups chopped apples: Fresh, tart apples are the star of the show! I love using Granny Smith for their zing, but feel free to mix in some sweeter varieties if you prefer.
- 1 teaspoon cinnamon: Cinnamon is a must for that warm, cozy flavor that screams fall.
- 1/2 cup chopped nuts (optional): Chopped walnuts or pecans add a nice crunch, but if you’re not a nut fan, feel free to skip them!
Gather these goodies, and you’re on your way to baking something truly special this autumn!
How to Prepare Apple Bars October Classic
Making these *Apple Bars October Classic* is a breeze! Just follow these simple steps, and you’ll have a warm, delicious treat ready to share with family and friends in no time.
Preheating and Mixing Ingredients
First things first, you’ll want to preheat your oven to 350°F (175°C). This ensures that your bars bake evenly and come out perfectly golden. While that’s heating up, grab a large mixing bowl and cream together the softened butter and sugar. I like to use a hand mixer for this part, but a good old-fashioned wooden spoon works just as well—just put a little muscle into it! Beat the butter and sugar until the mixture is light and fluffy, which usually takes about 2-3 minutes. Then, add the vanilla extract and mix well. This step is crucial, as it creates the buttery base that holds all the goodness together!
Combining Dry Ingredients
Now, let’s tackle the dry ingredients! In a separate bowl, whisk together the all-purpose flour, baking powder, and salt. This helps to evenly distribute the baking powder, so your bars rise nicely. It’s super important to combine these dry ingredients before adding them to the wet mixture. Doing this prevents the flour from clumping and ensures a smooth batter. Plus, it’s a great way to get some air into the mix before it all comes together!
Folding in Apples and Nuts
With your dry ingredients prepped, it’s time for the fun part—folding in those delicious apples! Gradually add the flour mixture to the creamed butter and sugar, stirring gently until just combined. Then, fold in the chopped apples, cinnamon, and, if you’re using them, the nuts. Be careful here! You want to maintain that lovely texture, so fold gently to avoid overmixing. The apples will add moisture and flavor, while the cinnamon gives it that cozy, autumnal aroma we all love.
Baking and Cooling
Once everything’s mixed, spread the batter evenly into a greased baking dish. Pop it into the preheated oven and bake for about 25-30 minutes. You’ll know they’re ready when the edges turn golden brown, and a toothpick inserted in the center comes out clean with just a few moist crumbs attached. Once baked, let the apple bars cool in the pan for about 10 minutes before transferring them to a wire rack to cool completely. Trust me, the wait is worth it! When they’re still warm, they’re absolutely heavenly—but I won’t judge if you sneak a piece before they cool down!
Why You’ll Love This Recipe
These *Apple Bars October Classic* aren’t just a delicious dessert; they’re a celebration of fall! Here are a few reasons why you’re going to fall head over heels for this recipe:
- Easy to Make: With simple, straightforward steps, you’ll have a cozy treat in no time, even if you’re a beginner in the kitchen!
- Deliciously Comforting: The combination of tender apples, warm cinnamon, and a buttery base creates a flavor that’s simply irresistible.
- Perfect for Gatherings: Whether it’s a family get-together or a potluck, these bars are sure to impress your guests and bring everyone together.
- Versatile Indulgence: Enjoy them warm with a scoop of ice cream, or pack them up for lunchboxes—either way, they’re a hit!
- Fall Nostalgia: Every bite is a reminder of those crisp autumn days, making them a seasonal favorite that you’ll want to bake year after year.
Trust me, once you make these apple bars, they’ll become a staple in your fall baking lineup!
Tips for Success
To make sure your *Apple Bars October Classic* turn out perfectly every time, here are some tried-and-true tips that I’ve gathered over the years:
- Use Fresh Ingredients: The quality of your apples can make a huge difference! Go for crisp, fresh apples like Granny Smith or Honeycrisp for that perfect balance of tartness and sweetness. If you can, buy them from a local orchard.
- Measure Carefully: Baking is a science, so be precise with your measurements. Spoon and level your flour, and don’t pack it down in the cup. This will help you avoid dense bars!
- Don’t Overmix: When combining the dry and wet ingredients, mix just until everything is incorporated. Overmixing can lead to tough bars, and nobody wants that. Remember, we want tender and crumbly!
- Keep an Eye on Baking Time: Every oven is different! Start checking your bars a few minutes before the suggested baking time. They’re done when they’re golden around the edges and a toothpick comes out with a few moist crumbs.
- Let Them Cool: Allow the bars to cool completely before cutting into them. This helps them set up nicely and makes for cleaner slices. Patience pays off!
With these tips in hand, you’ll be well on your way to creating the best apple bars that will have everyone coming back for seconds!
Nutritional Information
When it comes to enjoying these *Apple Bars October Classic*, it’s nice to know what you’re indulging in! Here’s a breakdown of the typical nutritional values per serving (1 bar):
- Calories: 200
- Fat: 10g
- Saturated Fat: 5g
- Unsaturated Fat: 4g
- Trans Fat: 0g
- Cholesterol: 30mg
- Sodium: 150mg
- Carbohydrates: 30g
- Fiber: 2g
- Sugar: 15g
- Protein: 2g
These values are estimates and can vary based on the specific brands of ingredients you use. But no matter the numbers, one thing’s for sure: these apple bars are a delicious treat worth every bite! Enjoy them guilt-free knowing you’re indulging in a comforting fall classic.
FAQ Section
Got questions about the *Apple Bars October Classic*? Don’t worry, I’ve got you covered! Here are some common queries I often hear, along with my answers to help you bake with confidence.
Can I substitute the apples?
Absolutely! While I love using Granny Smith for their tartness, you can mix and match with other varieties like Honeycrisp or Fuji for a sweeter flavor. Just make sure to balance it out with a bit of extra cinnamon if you go sweeter!
How should I store the apple bars?
To keep your apple bars fresh, store them in an airtight container at room temperature for up to three days. If you want to keep them longer, you can refrigerate them for about a week. Just remember to let them come back to room temperature before serving for the best flavor!
Can I freeze these bars?
Yes! These bars freeze beautifully. After they’ve completely cooled, wrap them tightly in plastic wrap and then in aluminum foil, or place them in a freezer-safe container. They can be frozen for up to three months. When you’re ready to enjoy, just thaw them in the fridge overnight.
What’s the best way to serve them?
While they’re delicious on their own, I highly recommend warming them up and serving with a scoop of vanilla ice cream or a drizzle of caramel sauce. You could even top them with whipped cream for an extra special treat! They’re perfect for fall gatherings or just cozy nights in.
Can I add other ingredients?
Definitely! Feel free to mix in raisins, dried cranberries, or even a handful of chocolate chips if you’re feeling adventurous. Just remember to adjust the sugar slightly if you’re adding sweet mix-ins. The possibilities are endless!
Storage & Reheating Instructions
To keep those delightful *Apple Bars October Classic* fresh and tasty, proper storage is key! Once they’ve cooled completely, pop them into an airtight container. They’ll stay delicious at room temperature for about three days. If you want them to last longer, you can refrigerate them for up to a week. Just make sure to let them come to room temperature before enjoying—trust me, the flavors really shine when they’re not cold!
If you find yourself with leftovers (which I doubt will happen!), you can also freeze the bars. Wrap them tightly in plastic wrap and then in aluminum foil, or use a freezer-safe container. They’ll keep well for up to three months. When you’re ready to indulge again, just thaw them in the fridge overnight and warm them up in the microwave for about 15-20 seconds. A little heat brings back that cozy, fresh-baked goodness!
Print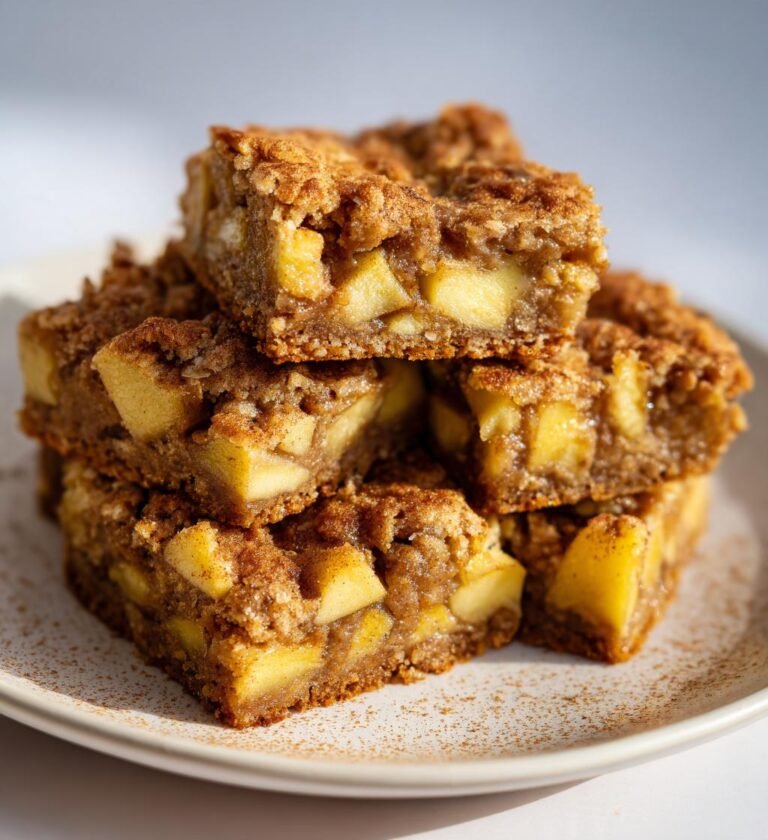
Apple Bars October Classic: 5 Reasons to Fall in Love
Delicious apple bars perfect for fall.
- Total Time: 45 minutes
- Yield: 12 bars 1x
Ingredients
- 2 cups all-purpose flour
- 1 cup sugar
- 1 cup butter, softened
- 1 teaspoon vanilla extract
- 1 teaspoon baking powder
- 1/2 teaspoon salt
- 3 cups chopped apples
- 1 teaspoon cinnamon
- 1/2 cup chopped nuts (optional)
Instructions
- Preheat the oven to 350°F (175°C).
- In a bowl, cream together butter and sugar.
- Add vanilla extract and mix well.
- In another bowl, combine flour, baking powder, and salt.
- Gradually add the dry ingredients to the wet mixture.
- Fold in chopped apples, cinnamon, and nuts.
- Spread the batter into a greased baking dish.
- Bake for 25-30 minutes or until golden brown.
- Allow to cool before cutting into bars.
Notes
- Store in an airtight container.
- Best served warm with ice cream.
- Can add raisins for extra flavor.
- Prep Time: 15 minutes
- Cook Time: 30 minutes
- Category: Dessert
- Method: Baking
- Cuisine: American
- Diet: Vegetarian
Nutrition
- Serving Size: 1 bar
- Calories: 200
- Sugar: 15g
- Sodium: 150mg
- Fat: 10g
- Saturated Fat: 5g
- Unsaturated Fat: 4g
- Trans Fat: 0g
- Carbohydrates: 30g
- Fiber: 2g
- Protein: 2g
- Cholesterol: 30mg
Keywords: Apple Bars, Fall Dessert, Classic Recipe