
Japanese katsu curry is one of those magical dishes that can instantly transport you to a cozy kitchen filled with comforting aromas. It’s a beloved staple in Japan, often enjoyed as a hearty meal after a long day. The combination of crispy breaded meat and a rich, flavorful curry sauce creates a delightful harmony that warms the soul. Seriously, once you try this dish, you’ll understand why it holds a special place in the hearts of many! It’s not just a meal; it’s comfort food at its finest. Plus, it’s super versatile and can be enjoyed with different proteins or veggies. Trust me, making Japanese katsu curry at home is easier than you think and the results are oh-so-satisfying!
Ingredients List
Gathering the right ingredients is key to making the best Japanese katsu curry! Here’s what you’ll need:
- 4 pieces of chicken or pork cutlets
- 1 cup of panko breadcrumbs
- 1 cup of all-purpose flour
- 2 large eggs, beaten
- 2 tablespoons of vegetable oil (for frying)
- 2 cups of diced potatoes (about 1-inch cubes)
- 1 cup of diced carrots (about 1-inch pieces)
- 1 onion, sliced thinly
- 2 tablespoons of curry powder
- 4 cups of chicken broth
- Salt to taste
Make sure to grab fresh ingredients for the best flavor. You’ll be amazed at how they come together to create that incredible curry sauce that coats everything perfectly!
How to Prepare Japanese Katsu Curry
Now, let’s dive into the exciting part—making your own Japanese katsu curry! Trust me, the steps are straightforward, and the rewards are absolutely delicious. Here’s how to do it:
Prepare the Meat
First things first, you’ll want to give your cutlets a good seasoning. Sprinkle some salt evenly over the chicken or pork cutlets on both sides. This little step is crucial because it enhances the meat’s flavor. Now, it’s time for the dredging! Start by setting up your “breading station” – it sounds fancy, but it’s super simple. Place the flour in one shallow dish, beat the eggs in another, and put the panko breadcrumbs in a third. Take each cutlet, dredge it in flour first, shaking off the excess. Then dip it into the beaten eggs, making sure it’s fully coated. Finally, roll the cutlet in the panko breadcrumbs, pressing gently to adhere. The more panko, the better the crunch!
Fry the Cutlets
Next up, let’s fry those beauties! Heat about 2 tablespoons of vegetable oil in a large frying pan over medium heat. You want the oil hot but not smoking—careful, it splatters! To test if it’s ready, drop a small piece of panko in; if it sizzles, you’re good to go. Fry the cutlets for about 4-5 minutes on each side, or until they’re golden brown and crispy. The sound of that sizzling is music to my ears! Once cooked, remove them from the pan and set them aside on a paper towel-lined plate to drain off any excess oil. This way, they stay crispy and delicious!
Make the Curry Sauce
Now, let’s whip up that luxurious curry sauce! In the same pan (don’t clean it—those brown bits are flavor!), add a bit more oil if needed and toss in the sliced onions. Sauté them for about 3-4 minutes until they turn translucent and fragrant. Then, add the diced potatoes and carrots, stirring them in with the onions. Sprinkle in the curry powder and mix well to coat everything evenly. This is where the magic begins! Pour in the chicken broth and bring it to a gentle simmer. Let it cook for about 15-20 minutes, or until the vegetables are tender. You’ll be blown away by how good your kitchen smells right now!
Serve the Dish
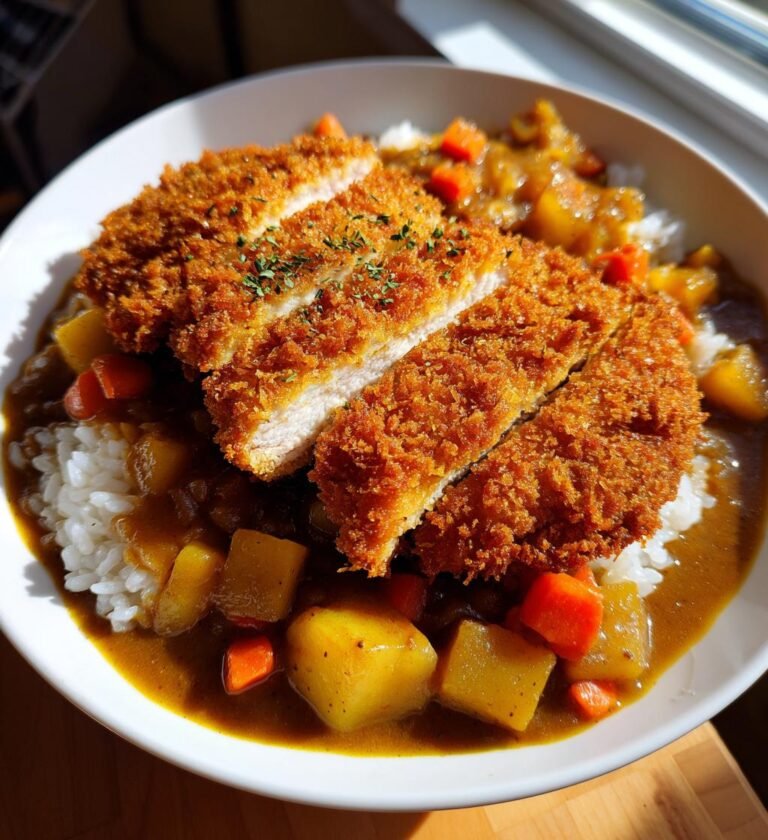
It’s finally time to plate your masterpiece! Slice the fried cutlets into strips—this makes for a beautiful presentation and easier eating. Serve the sliced cutlets over a generous helping of steamed rice, then ladle that rich curry sauce over the top. Don’t be shy with the sauce; it’s what makes this dish so comforting and delicious! You can garnish with some chopped green onions if you’d like, but honestly, it’s pretty perfect just as it is. Enjoy every last bite—your taste buds will thank you!
Why You’ll Love This Recipe
- Quick to Prepare: With just 50 minutes from start to finish, you can whip up a delicious meal that the whole family will love!
- Easy Steps: The process is straightforward, making it perfect for both novice cooks and seasoned chefs looking for a delightful dish.
- Flavor Explosion: The combination of crispy cutlets and rich curry sauce creates a mouthwatering flavor profile that you won’t be able to resist.
- Comfort Food Classic: Japanese katsu curry is the definition of comfort food, providing warmth and satisfaction with every bite.
- Customizable: Feel free to switch up the proteins or add in your favorite veggies to make it your own!
Tips for Success
Now that you’re ready to dive into making your Japanese katsu curry, here are some top tips to ensure you achieve the best results every time!
Perfecting the Frying Technique
Frying is where the magic really happens, and it’s all about temperature! Make sure your oil is hot enough before adding the cutlets. If it’s too cool, you’ll end up with soggy meat instead of that crispy coating we all love. Use a deep-frying thermometer if you have one, aiming for around 350°F (175°C). Remember to work in batches if your pan isn’t large enough; overcrowding can lower the oil temperature and ruin that crunch!
Ingredient Substitutions
If you’re looking for a twist or have dietary restrictions, don’t hesitate to switch things up! For a gluten-free option, you can use gluten-free panko breadcrumbs and flour. You can also substitute chicken or pork with tofu or shrimp for a vegetarian or seafood version. Just ensure that you adjust cooking times accordingly—shrimp will need less time, while tofu may need more depending on how it’s prepared.
Getting the Right Curry Flavor
The curry powder you choose can really make a difference. I recommend using a Japanese curry powder for an authentic taste. If you like a kick, try adding a pinch of cayenne pepper or some finely chopped fresh ginger to the mix for an extra layer of flavor. Also, taste your curry sauce as it cooks! This way, you can adjust the seasoning to your preference.
Serving Suggestions
For an extra special touch, consider serving your Japanese katsu curry with a side of pickled vegetables or a simple salad. The acidity from the pickles balances out the richness of the curry beautifully. And if you’re feeling adventurous, try adding a fried egg on top of your katsu for that extra indulgence!
Lastly, don’t forget to enjoy the process! Cooking is all about having fun and experimenting, so get creative and make this dish your own!
Variations of Japanese Katsu Curry
One of the best things about Japanese katsu curry is how versatile it is! You can easily switch things up to keep your meals exciting. Here are some fun variations to try:
Protein Swaps
If you’re not in the mood for chicken or pork, don’t worry! You can use different proteins that still deliver that satisfying crunch and flavor. Try using:
- Tofu: For a vegetarian option, press firm tofu to remove excess moisture, then slice it into cutlets and follow the same breading process. This gives you a delicious plant-based version that’s equally satisfying!
- Shrimp: For a seafood twist, use large shrimp, peeled and deveined. Coat them in the same breading and fry until crispy. The sweetness of the shrimp pairs beautifully with the curry sauce!
- Eggplant: Slice eggplant into thick rounds, bread them, and fry for a unique vegetarian option. The eggplant absorbs the curry sauce wonderfully!
Vegetable Additions
Feel free to get creative with the vegetables you add to the curry sauce. Some great options include:
- Bell Peppers: Adding sliced bell peppers contributes a sweet crunch and vibrant color.
- Zucchini: Diced zucchini cooks quickly and adds a lovely texture to your curry.
- Peas: Toss in some frozen peas during the last few minutes of cooking for a pop of sweetness and color.
Spice it Up
If you enjoy a bit of heat, consider spicing things up with different seasonings:
- Curry Paste: Swap out curry powder for a flavorful Japanese curry paste for a richer taste.
- Chili Flakes: A pinch of dried chili flakes can elevate the heat level without overpowering the dish.
- Fresh Ginger or Garlic: Adding minced garlic or ginger while sautéing the onions gives the sauce a fresh, aromatic kick.
These variations not only keep your Japanese katsu curry fresh but also let you tailor it to your taste preferences or dietary needs. So go ahead and experiment—your perfect katsu curry is just a few tweaks away!
Storage & Reheating Instructions
Now that you’ve enjoyed your delicious Japanese katsu curry, you might be wondering how to store those tasty leftovers. Don’t worry; I’ve got you covered!
First, let the curry cool down to room temperature before you store it. This helps prevent condensation from forming, which can make it watery. Once cooled, transfer the curry sauce and cutlets into airtight containers. I recommend storing them separately if possible, as this keeps the cutlets crispy for longer. If you can’t do that, just be sure to reheat them gently to maintain their texture.
For best results, you can keep the leftover katsu curry in the refrigerator for up to 3 days. If you want to keep it longer, consider freezing it! Just make sure to use freezer-safe containers or freezer bags, and it should last for about 2-3 months. When you’re ready to enjoy it again, thaw it in the refrigerator overnight before reheating.
Now, when it comes to reheating, there are a couple of methods that work wonders. For the curry sauce, you can heat it gently on the stovetop over medium-low heat, stirring occasionally until it’s warmed through. If you’re in a hurry, the microwave works, too! Just pop it in a microwave-safe bowl and heat in short bursts, stirring in between to avoid hot spots.
As for the cutlets, to keep them crispy, I like to reheat them in the oven. Preheat your oven to 375°F (190°C), place the cutlets on a baking sheet lined with parchment paper, and bake for about 10-15 minutes until they’re hot and crispy again. This method helps maintain that delightful crunch that makes katsu so special!
And there you have it! With these simple storage and reheating tips, you can enjoy your Japanese katsu curry as if it were freshly made. Happy eating!
Nutritional Information Disclaimer
Please keep in mind that the nutritional information provided for this Japanese katsu curry is an estimate and can vary based on the specific ingredients and brands you use. Factors like the type of meat, the oil you choose for frying, and even the amount of curry powder can affect the overall nutrition. If you need precise nutritional data for dietary purposes, I recommend using a nutrition calculator or app that allows you to input your specific ingredients. Cooking is all about enjoying the process, so focus on making it delicious and comforting!
FAQ Section
Q1: What is Japanese katsu curry?
Japanese katsu curry is a delicious dish that combines breaded and fried meat, typically chicken or pork, served over rice with a rich, flavorful curry sauce. It’s a comforting meal that’s beloved in Japan and increasingly popular around the world. The crispy texture of the katsu paired with the warm, savory curry creates a delightful experience!
Q2: Can I make Japanese katsu curry vegetarian?
Absolutely! You can easily make a vegetarian version by using tofu or even eggplant as a substitute for meat. Just follow the same breading process, and you’ll have a satisfying and delicious katsu curry that everyone can enjoy. Pair it with your favorite vegetables in the curry sauce for added flavor and texture!
Q3: How spicy is Japanese katsu curry?
The spice level of Japanese katsu curry can be adjusted according to your taste. Traditional Japanese curry is relatively mild, but if you prefer a kick, you can add more curry powder or even some chili flakes. Feel free to experiment with the spice levels to find your perfect balance!
Q4: What can I serve with Japanese katsu curry?
While Japanese katsu curry is typically served over rice, you can also enjoy it with a side of steamed vegetables, pickled radishes, or a fresh salad. These sides help to balance the richness of the curry and provide a more complete meal. Don’t forget to serve it with a dollop of your favorite Japanese pickles for a burst of flavor!
Q5: How do I store leftovers of Japanese katsu curry?
To store leftovers, let the curry cool to room temperature and then transfer it to airtight containers. You can keep it in the refrigerator for up to 3 days. For longer storage, freeze it in freezer-safe containers for up to 2-3 months. When you’re ready to enjoy it again, simply thaw it overnight in the fridge and reheat gently!
Japanese Katsu Curry: 5 Steps to Ultimate Comfort Food
Japanese katsu curry is a popular dish featuring breaded and fried meat served with a rich curry sauce.
- Total Time: 50 minutes
- Yield: 4 servings 1x
Ingredients
- 4 pieces of chicken or pork cutlets
- 1 cup of panko breadcrumbs
- 1 cup of all-purpose flour
- 2 large eggs
- 2 tablespoons of vegetable oil
- 2 cups of diced potatoes
- 1 cup of diced carrots
- 1 onion, sliced
- 2 tablespoons of curry powder
- 4 cups of chicken broth
- Salt to taste
Instructions
- Prepare the meat by seasoning with salt.
- Dredge the cutlets in flour, dip in beaten eggs, and coat with panko breadcrumbs.
- Heat oil in a pan and fry the cutlets until golden brown on both sides.
- Remove the cutlets and set aside.
- In the same pan, sauté onions until translucent.
- Add potatoes, carrots, and curry powder; stir well.
- Pour in chicken broth and simmer until vegetables are tender.
- Slice the fried cutlets and serve over rice with curry sauce.
Notes
- Serve with steamed rice for a complete meal.
- Adjust spice level by varying the amount of curry powder.
- Leftovers can be stored in the refrigerator for up to 3 days.
- Prep Time: 20 minutes
- Cook Time: 30 minutes
- Category: Main Course
- Method: Frying and Simmering
- Cuisine: Japanese
- Diet: Gluten Free
Nutrition
- Serving Size: 1 serving
- Calories: 600
- Sugar: 5g
- Sodium: 800mg
- Fat: 30g
- Saturated Fat: 8g
- Unsaturated Fat: 15g
- Trans Fat: 0g
- Carbohydrates: 60g
- Fiber: 5g
- Protein: 25g
- Cholesterol: 100mg
Keywords: Japanese katsu curry, curry, breaded meat, comfort food