
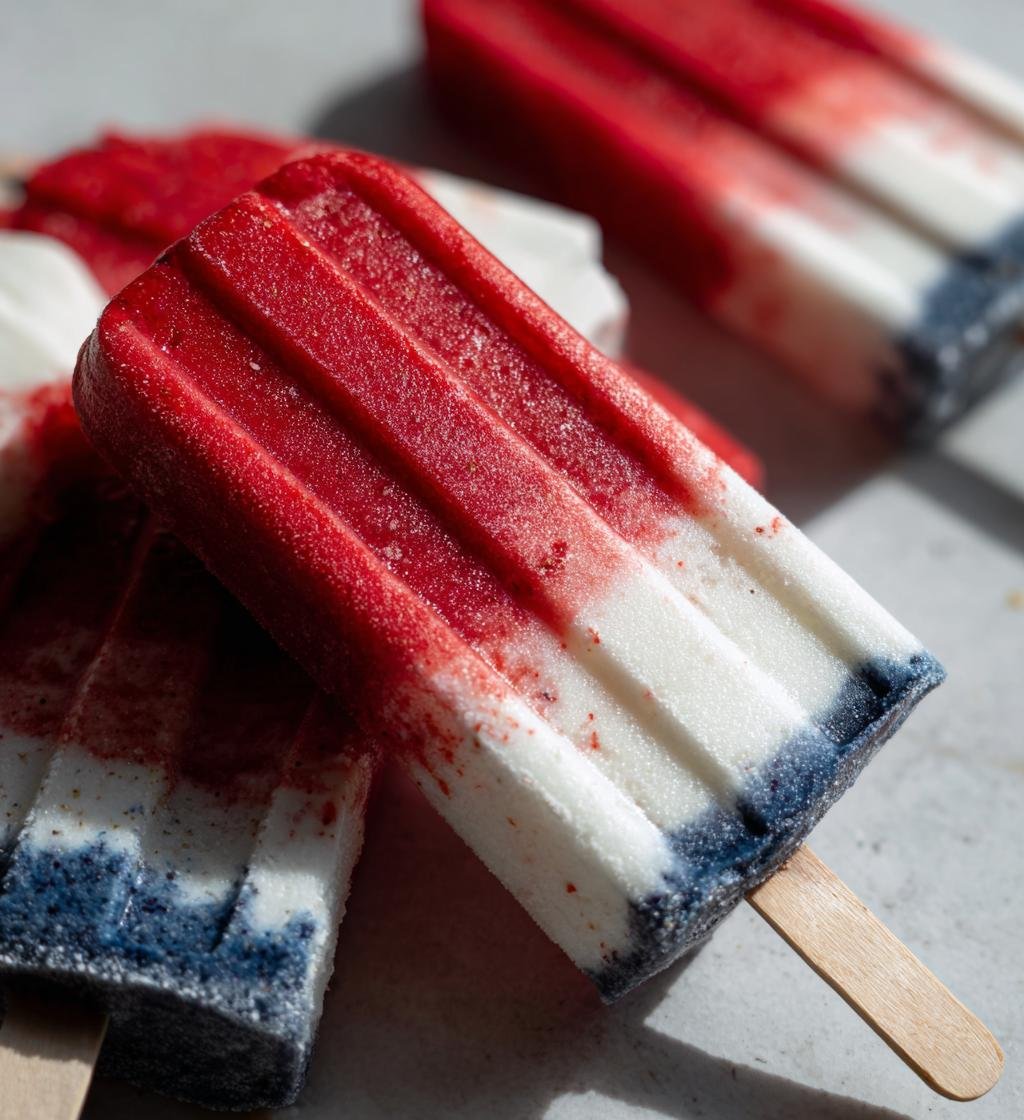
Ah, summer! There’s nothing quite like the feeling of sunshine on your face and the sweet taste of a popsicle melting in your hands. I remember those lazy afternoons as a kid, running around outside, only to find relief from the heat with a colorful, icy treat. That’s when I fell in love with popsicles! The *Red White Blue Popsicles* have become a cherished recipe in my home, not just for their vibrant colors but for the refreshing burst of flavors that remind me of summer celebrations. They’re perfect for backyard barbecues or just a fun treat on a hot day. Each layer of strawberry, coconut, and blueberry comes together to create a delightful experience that’s both tasty and visually stunning. Trust me, these popsicles will have you reminiscing about your childhood summers while keeping you cool and satisfied. Let’s dive into making this classic summer delight!
Ingredients
- 2 cups strawberries, pureed (fresh is best for that vibrant flavor!)
- 2 cups coconut milk (I love using the full-fat variety for creaminess)
- 2 cups blueberries, pureed (frozen blueberries work too if fresh aren’t available)
- 2 tablespoons honey (optional, adjust to your sweetness preference)
How to Prepare Classic Red White Blue Popsicles
Getting these *Red White Blue Popsicles* ready is as fun as eating them! Follow along with me, and I promise you’ll have a refreshing treat that’s super easy to make.
Step 1: Prepare the Strawberry Layer
First up, let’s get those strawberries ready! Grab your blender and toss in the 2 cups of fresh strawberries. Blend them until they’re smooth and luscious – you want that vibrant red color! Once you’ve got the perfect puree, it’s time to fill your popsicle molds. Pour the strawberry mixture in, making sure to fill each mold about one-third full. This layer needs some time to set, so pop them in the freezer for about 1 to 2 hours. You want them firm enough to hold the next layer without mixing together.
Step 2: Add the Coconut Milk Layer
While the strawberry layer is setting, let’s prepare the coconut milk! In a bowl, mix together the 2 cups of coconut milk and the honey if you’re using it. Stir until it’s well combined; the sweetness from the honey really enhances the flavor. Once your strawberry layer is set, take the molds out of the freezer and gently pour the coconut milk mixture into each mold, filling them another third of the way. Return them to the freezer for another 1 to 2 hours. This step is crucial because it creates that creamy white layer we love!
Step 3: Complete with Blueberry Layer
Now for the final layer – blueberries! Rinse out your blender, then add 2 cups of blueberries and blend until smooth. This layer is going to be a beautiful deep blue. Remove the molds from the freezer and pour the blueberry puree in, filling them to the top. Don’t worry if it overflows a little; that just adds to the charm! Insert the sticks into each mold and then freeze until they’re completely set—this usually takes about 4 hours or, for best results, overnight.
Step 4: Final Freezing and Serving
When you’re ready to enjoy these popsicles, take them out of the freezer and let them sit for a minute. This helps with removing the popsicles from the molds. Gently run warm water over the outside of the molds for a few seconds if they’re stubborn. Then, give them a little twist, and they should pop right out! Serve them right away and watch everyone’s faces light up as they enjoy this colorful, refreshing treat!
Why You’ll Love This Recipe
- Refreshing and Delicious: The combination of strawberry, coconut, and blueberry creates a burst of flavor that’s perfectly refreshing on a hot day.
- Super Easy to Make: With just a few simple steps, you’ll have popsicles ready to freeze, making it a hassle-free treat for any occasion.
- Healthy Ingredients: Made with fresh fruit and coconut milk, these popsicles are a guilt-free indulgence everyone can enjoy.
- Customizable Sweetness: You can easily adjust the sweetness to your liking, making them perfect for all taste buds.
- Visually Stunning: The vibrant red, white, and blue layers make these popsicles a showstopper at any summer gathering!
Tips for Success
Making the perfect *Red White Blue Popsicles* is all about a few simple tricks that ensure they turn out just right. First, make sure your fruit is fresh! Overripe strawberries or blueberries can affect the flavor and texture, so pick the best ones you can find.
When pureeing, don’t overdo it; you want a smooth consistency without losing the vibrant color. If you’re using frozen fruit, let it thaw slightly before blending to achieve a smoother puree. Trust me, this makes a world of difference!
Also, when layering, allow each layer to freeze completely before adding the next. This prevents the colors from blending together, which is key for that stunning red, white, and blue look. And don’t forget to run warm water over the molds for easy removal—this little trick saves you from the dreaded stuck popsicle!
Lastly, have fun with it! The creativity in making these popsicles is part of the joy. Enjoy your summer treat!
Nutritional Information
These *Red White Blue Popsicles* are not only a delight to eat but also a guilt-free treat! Each popsicle contains approximately 70 calories, making them a light option for those warm summer days. Here’s a quick breakdown of the estimated nutritional data per serving:
- Calories: 70
- Sugar: 8g (natural sugars from the fruit)
- Fat: 3g
- Saturated Fat: 2g
- Carbohydrates: 10g
- Fiber: 1g
- Protein: 1g
Keep in mind that these values are estimates and can vary based on the specific ingredients you use. Enjoy these wholesome popsicles knowing they’re packed with flavor and freshness!
FAQ About Classic Red White Blue Popsicles
Can I use frozen fruit?
Absolutely! Frozen fruit can work wonders in this recipe. Just let the frozen strawberries and blueberries thaw a bit before blending to ensure a smooth consistency. If they’re still too icy, they might not blend well, which can affect the texture of your popsicles. You might also want to add a splash of water or a little extra honey to help with blending if you find the mixture too thick. Trust me, using frozen fruit doesn’t compromise the flavor, and it makes it super convenient!
How long can I store these popsicles?
These *Red White Blue Popsicles* can be stored in the freezer for up to 2 months, but they’re so delicious, I doubt they’ll last that long! Just make sure to keep them in an airtight container or wrap them individually in plastic wrap to prevent freezer burn. If you notice any ice crystals forming on the surface, that’s a telltale sign they need to be enjoyed soon. The fresher, the better!
Can I substitute coconut milk?
Yes, you can definitely substitute coconut milk! If you’re looking for a creamier texture, plain yogurt is a fantastic option. It adds a nice tang and creaminess that pairs beautifully with the fruit layers. You could also use almond milk or cashew milk for a lighter version, but keep in mind that these alternatives might make the popsicles less creamy. Each substitution will change the flavor slightly, so feel free to experiment and find your favorite!
Storage & Reheating Instructions
Storing your *Red White Blue Popsicles* is super simple! Just keep them in an airtight container or wrap them individually in plastic wrap to prevent freezer burn. This way, they stay fresh and ready for those hot summer days. They’ll keep well in the freezer for up to 2 months, but let’s be honest, they probably won’t last that long!
When you’re ready to enjoy them again, there’s no need to reheat—just let them sit at room temperature for a minute or run some warm water over the outside of the molds to help them pop out easily. Enjoy every refreshing bite!
Print
Red White Blue Popsicles — A Sweet Summer Classic Delight
Classic Red White Blue Popsicles are a refreshing summer treat.
- Total Time: 5 hours
- Yield: 10 popsicles 1x
Ingredients
- 2 cups strawberries, pureed
- 2 cups coconut milk
- 2 cups blueberries, pureed
- 2 tablespoons honey (optional)
Instructions
- Puree the strawberries in a blender until smooth.
- Layer strawberry puree into popsicle molds, filling each about one third full.
- Freeze for 1-2 hours until set.
- In a bowl, mix coconut milk with honey, if using.
- Pour coconut milk mixture into molds, filling another third.
- Freeze for another 1-2 hours until set.
- Puree the blueberries in a blender until smooth.
- Pour blueberry puree into molds, filling to the top.
- Insert sticks and freeze until fully set, about 4 hours or overnight.
- Remove popsicles from molds and enjoy.
Notes
- Adjust sweetness based on your preference.
- Use fresh or frozen fruit for purees.
- Substitute coconut milk with yogurt for a creamier texture.
- Prep Time: 15 minutes
- Cook Time: 0 minutes
- Category: Dessert
- Method: Freezing
- Cuisine: American
- Diet: Vegan
Nutrition
- Serving Size: 1 popsicle
- Calories: 70
- Sugar: 8g
- Sodium: 5mg
- Fat: 3g
- Saturated Fat: 2g
- Unsaturated Fat: 1g
- Trans Fat: 0g
- Carbohydrates: 10g
- Fiber: 1g
- Protein: 1g
- Cholesterol: 0mg
Keywords: Red White Blue Popsicles, Classic Popsicles, Summer Treat